Nat's Nuigurumi Arc - Part 1
November 08, 2025
First off, how did this start?
Plushie & doll making is something I wanted to do for a long time. Since I was in middle school. I remember saving a ton of plush patterns on Pinterest back then (albeit MLP & dragon patterns than humanoid dolls). But the interest fizzled out.
Flash forward to adulthood. After seeing a few people from the JP side of the IIDX community make dolls of their favorite characters, the thought crossed my mind; "Wouldn't it be fun to make a doll of Nix?".
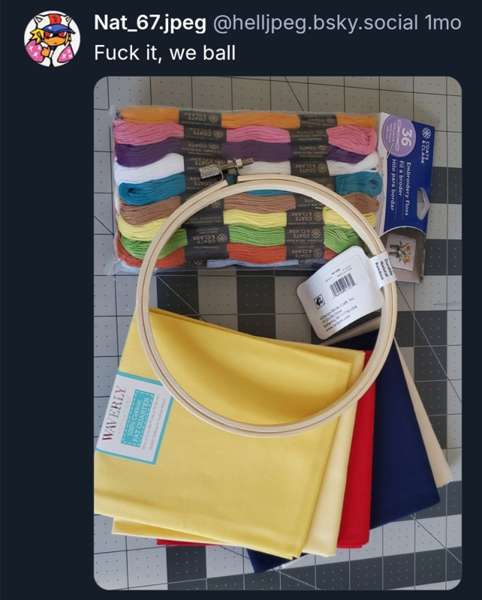
I was pretty hesitant to jump into these projects, mainly because thanks to certain US lawmakers getting materials from some of the more common supply sources is now far more expensive. I wasn't sure about working with cheaper materials at first. But at some point, I just embraced the "fuck it, we ball" mindset. I feel it'd be better to at least try with whatever's easily accessible to me than to bar myself off from the craft entirely.
And so, possessed with the need to make a doll of my favorite character, I journeyed into the nearest big-box store with a craft isle and bought some cotton squares and embroidery supplies.
This post is not meant to be a tutorial, more-so talking about my process and thoughts. But I'll leave a few notes for those looking to try out the craft.
Materials & Prep
Prep work was... very disjointed. I actually bought the materials before I settled on a pattern or even a concept & as a result made way too many trips to the craft isle. The good thing is, I have some materials at home already. I had some sewing supplies from when I first wanted to try plushie making, as well as a bag of Polyfill I never used.
As brought up earlier, the main material I used was cotton, mainly because it's cheap and very easy to find in stores in my area. Plus, compared to other options like felt and fleece, this doesn't give me nearly as much of a 'sensory ick' when I touch it. In terms of doll-making, I'm pretty sure it's more commonly used in western-style rag dolls. Those are usually larger, and have flatter, simpler shapes that work well with non-stretchy fabric. Though the patterns I set out to use were for east-asian style cotton dolls, which from my observations tend to be smaller and have more tiny details that work better with stretchy-er materials like minky.
I walked into this knowing the material would cause problems, but I'll still list my thoughts on them anyways. Like how I didn't want to bar myself from the craft, I think for those wanting to try despite not having access to minky, it'd be better to let people know about the problems I ran into than to leave it at "don't use this, use this" (I still haven't sewn with minky & can't give a fair comment on it anyways).
Material Quirks
- Cotton doesn't stretch, which I found made turning things inside out around tighter areas harder. Was difficult on the 10cm pattern, will use larger patterns if I use this material again.
- Frays very easily. Workable, but becomes a major annoyance with a project you'll be handling a lot during the making of it. I recommend either fray-checking it before cutting (adding fray-check along the edge of the seam allowance you'll cut on), or pinking the edges (cutting a zig-zag pattern into the seam allowance) to keep it manageable.
- Thinner material means damages are more obvious, and stuffing can poke out & be more visible on darker surfaces.
- Seams are a lot more visible given there's no pile to hide it, and it's very thin. So be extra careful to color match your threads & test your materials to see if it'll show through on the final
- To my knowledge, solid colors don't have a right or wrong side. I'd still mark the patterns perpendicular to the edges, but it's one thing you can take advantage of here.
- Scratchy-ness can vary. Generally, I don't have as much issues with quilting cotton, but I noticed some of the colors I used were stiffer or scratch-ier feeling than others. I found handling can soften the fabric overtime, but it's something to keep in mind for those with sensory concerns.
- Cotton is a lint magnet. Keep your work area clean & if you're carrying your finished doll in a bag (like as a travel companion or in storage), you might want to put it in a protective bag or pouch.
And since I'm here, I'll note some other problems I had due to user-error:
User Error (or things that were my fault)
- Embroidery thread doesn't make good sewing thread. On Nix, I thought it'd be good to use up some leftovers to sew up the doll. Embroidery thread is thicker & while it can do the job, it's more visible on the final even with color matching.
- Fray-checked edges still get ragged with constant handling. This happened on clothing for my first doll. These are removable & I can replace them as needed, but I'll opt to hem edges for clothes I expect to handle a lot going forward.
- Friction pen can bleed with water. While washing off some embroidery stabilizer on my second doll, some of the ink bled through the already thin fabric (and on the embroidery). It disappeared when I applied heat to it of course, but I'll be careful when taking them out during the colder weather & use water-soluble pens for the face next time.
- Nix's head ended up floppy. I think this was a combination of not being confident with my ladder stitches when attaching it to his body, and the clasp adding extra weight.
In terms of other prep-work. I did some digging for patterns and settled on two free ones by the Youtuber Tacute; 10cm standing & 15cm pukkuri. His tutorials are entirely in Japanese, but I feel like they're visually clear enough that you can follow along regardless of a language barrier. There's also bases onsite I used for concepting.
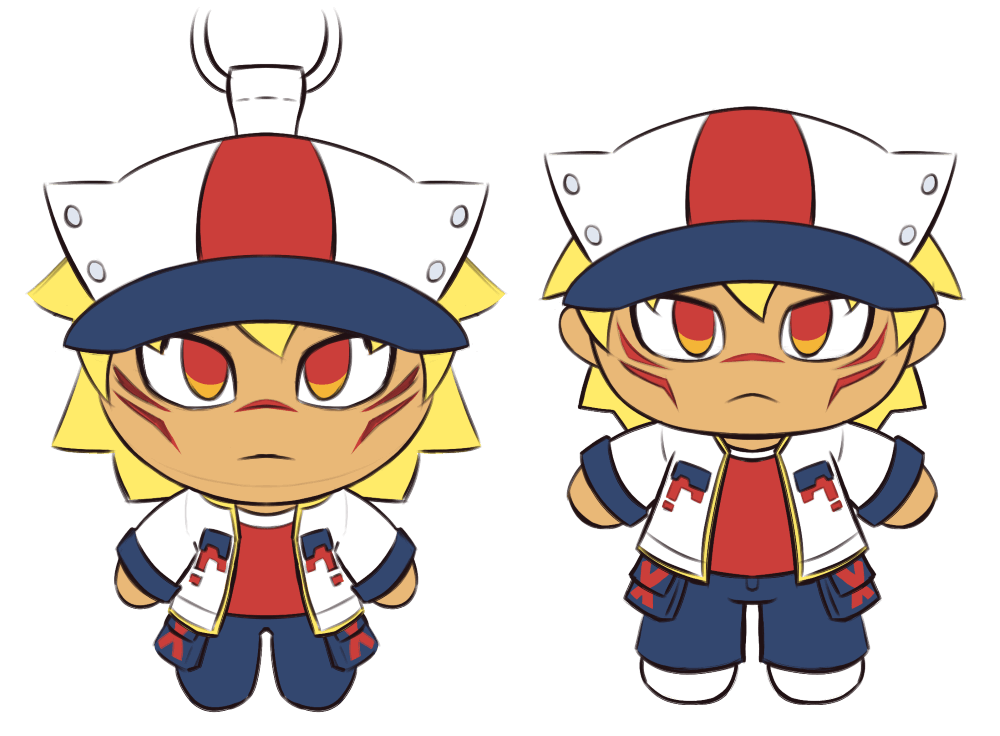
Concepts. I ended up simplifying his clothes in the final to keep it easy to sew
For embroidery, I bought a multi-pack of thread to start off and an embroidery kit to practice on before I moved onto the final. It added a few days to the first project, but I think this was a good idea. Embroidery was completely new to me so starting with a kit let me learn the various stitches beforehand, and I felt it also helped get a grasp of some sewing techniques too. Though, I'd probably suggest going for something simpler if it's your first time. The kit I picked up took several days.
The Dolls Themselves
The initial plan was to create two dolls of Nix: a smaller one I could use as a bag charm, and a larger one that I'd interact with as a regular doll & give more detailed outfits to.
10cm Nix was first. For the most part, sewing the base body was straight forward. I made some of his clothes part of the base doll and added a clasp to make him into a charm. I ended up making his hair separately. Each section of it was made with two pieces of fabric sewn together to give it some thickness.
The hat was hard to figure out. I have no idea if this style of hat exists in real life, so I had to figure out a pattern on my own by making a tape mock-up. In his art it seems to be one piece of fabric wrapped around and creased to look like cat ears, but to keep in-line with my sewing skills I ended up making it separate pieces.
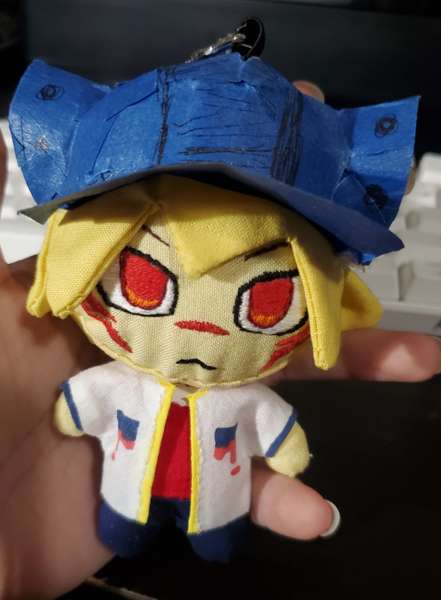
Honestly even with a lot of my skill issues I ended up getting attached to the guy. He's scrungly!

Now... what about the other Nix? He ended up getting put on hold since I wanted to upgrade my materials. I found a US-based minky supplier; Big Z Fabrics & now have some on standby. But since I'm using more expensive fabrics and know that I'll get attached to the final, I wanted to see if I liked the size of the pattern first.
The doll I ended up making was Io, based on the 15cm pattern (though likely due to my printer settings, they ended up being slightly shorter). They're also made of cotton, and I ended up course correcting on a lot of my mistakes with Nix. Most of their hair was sewn into the base (except for the bangs).

They currently don't have wings. This is because I want to be able to easily make new clothes for them & felt sewing them directly on the body would get in the way. I'll just say they have them dismissed. I do want to make wings for them, but I'm thinking about making them a separate accessory I can put over their outfits.
Right now they just have a shirt for modesty. Though I want to give them a bigger wardrobe at some point
Conclusion
Overall, I'm glad I decided to go into the project regardless of having minky or not. It let me tick off a project I've wanted to do since I was younger. And I still have the materials on standby for the next Nix doll.
Though like I said earlier, that one's still on hold. There's a few more decisions I want to make. Like if I want to dye one of the fabrics to get him closer to my concepts. I'd need to buy all new dying supplies, make room for them in the house... and this project's gone way over-budget as is. There's also wondering what I'm going to do with the rest of the fabric. The main thing I can think of making is... another Nix, or another blond-haired character. And I feel buying more fabric to make others will lead to more fabric I'd need to figure out what to do with.
After the larger Nix, I'm not sure how much I'll post about doll making going forward, or even how many more I'll make. While I still see them as art pieces & want to talk about my process, I made them to be personal objects above everything. It's why I didn't take polished pics immediately after making them. I don't want the need to post to get in the way of working on them, nor being able to enjoy my dolls when they're finished. You might see them in passing on my socials, but I'll likely only give updates on making them if it's something I feel is major enough to share.
Part 2 will be about the second project... when I get to it.